Tuesday, October 30, 2012

Holiday Prep for Handmade Business, Part 3: Packaging

When a customer receives a package from your handmade business, they should be excited! They are opening something special.  The packaging should reflect how unique the contents are.  What can you do to stand apart without investing significant amounts of time and money on intricate wrapping?

product packaging
Via Cutiepie Company on Flickr


Packaging handcrafted goods can be both fun and challenging.  Finding the right details to set the tone takes time.  Think of the word handmade.  What do you envision? To me, it resonates with original, imperfect, detailed, and creative.  I do not think of it as busy, overbearing, or trying too hard.

I relish the little details.  Simple, clever additions that don't try to go overboard. The use of decorative edge scissors.  Textures on bows or fabric. Stamps and stickers can be good ways to include your theme without being overly expensive. Reusing items in a surprising way.  A pleasing color scheme. What materials will invoke your product and your self  into the overall look of the parcel?

The gift shown here from Cutiepie Company is the perfect example.  It is wrapped in elementary school writing paper.  Very simple, yet a surprising choice. They have added a ribbon - small, not complex, and complimentary to the lines on the paper. Stamping the recipient's name is great. The font is legible and not overly sophisticated.  Red stands out on the paper and brings to mind a teacher's grade at the top of the page.  I would guess the package might hold a journal, stationery, or special writing set.

Consider the recipient of your item.  Do you sell to men and women? Simplify things by going with gender neutral packaging.  The gift in the photo could be for anyone of any age on any occasion.  It is charming enough to be a holiday gift.  Try to find wrapping that works year round.  This makes things easier on you as a seller.

As you prepare to ship those holiday orders for your handmade business, reflect on the presentation of your goods.  What message are you giving about the contents?

Visit my earlier posts on holiday preparations for shipping  and materials.


Wednesday, October 10, 2012

Holiday Prep for Handmade Business, Part 2: Materials

Last week I took an inventory of my materials.  This can be a dull process, but it must be done.  When holiday orders are coming in, who wants to turn customers away because they ran out of yarn to knit scarves or silver to make necklaces?

Some tips to prepare a Handmade Business for the Holidays:

  • Set aside time to look through your goods now.
  • Which materials are running low?
  • Estimate which of your items will be in demand.  What is generating the most interest? Consider getting extra materials to produce more of that particular favorite.
  • Planning a new piece for your line? The holidays could be a good time to introduce something different to draw in fresh buyers and bring back previous customers.  What supplies are necessary to create this? 
  • Don't forget about office supplies: tape, printer ink, labels, business cards, pens, etc.   
  • Make a detailed list of needed items and, when possible, a notation of where to purchase.
Getting that order for materials in now means that you can price compare.  Who will give you the best deal? Do you have any discount codes to use before they expire at year's end? Ordering early eliminates the need to pay extra for rush delivery to your shop. You'll have time to wait for standard shipping. Finally, if anything is on back order, you have a head's up to plan for this inconvenience.

Read an earlier post on preparing for holiday shipping here.


Tuesday, October 2, 2012

Holiday Prep for Handmade Business, Part 1: Shipping Materials

The Holidays are rapidly approaching, and a handmade business needs to be prepared. Customers' orders should be shipped promptly. Having suitable packaging materials ready to go will accelerate the process.  

The jewelry I send is first placed into a gift box. This keeps pieces secure during mailing, and the item arrives ready to be given as a present - no additional wrapping required.  I consider the dimensions of my handmade goods when deciding which size gift box will work best.  A few more things to contemplate:  Is there a particular item that is popular with buyers? Will I be selling custom orders? If so, I may need more of one specific size box than others. Estimate and plan for this.  Rio Grande has a nice selection of jewelry packaging. Their gift boxes are available in a number of sizes or can be purchased in variety packs.

Once gift boxes are resolved, it is time to choose shipping materials.  I do a fair amount of online shopping.  This occasionally leaves me with bubble wrap and kraft wrap.  If clean and like new, the wrap can be reused for my own shipping purposes. I simply store it away until needed.

A box full of boxes
 Boxes for mailing my jewelry must be small, yet big enough to accommodate the aforementioned gift boxes.  I recently ordered from  Uline.  Their shipping boxes come in every shape imaginable. I am a visual person, so I drew the length and width of the shipping box that I was considering buying onto a piece of paper.  Then I  placed a gift box inside the lines to evaluate the fit. Keep a ruler handy to check the height.  Most boxes are sold in bundles, which allows Uline to have competitive pricing. However, they only send orders via UPS, so plan for this extra expense.

How do you streamline holiday shipping?


Tuesday, September 18, 2012

Finishing the edges of leather

When incorporating leather into a piece of jewelry, I like to give the cut sides a finished appearance.  This is fairly easy to do.

Freshly Cut
You will need:
  • Q-tips
  • Distilled water
  • Beeswax
  • Lamp
  • Soft, sturdy fabric (denim from old jeans is ideal)
  • Dremel tool with cotton buffing attachment (or an additional piece of denim)
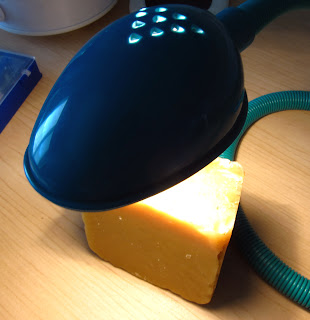
Set the beeswax under a lamp before starting.  It will become soft and easy to work with.

Block of Beeswax with Adjustable Arm Lamp

Cut a two inch by two inch square from the fabric, fold it over, and set aside.  Dip a Q-tip in distilled water and run it over the raw edge of leather.


With light pressure, rub your fabric across this moistened edge.  Keep your movement going in one direction; not back and forth.  This motion will help the fibers to lay flat. The leather must stay damp throughout this process.  Add water as necessary with the Q-tip and continue buffing with the fabric until smooth.


Apply the softened beeswax to a small, cotton buffing attachment on your Dremel or to the extra piece of fabric. Buff the edge of your leather with wax, moving in the same direction as before.  The leather will gain a burnished feel and appearance.


Remove any extra wax from your piece with a soft cloth.

A Smooth Finish

*Please note the leather I work with is no greater than 5 mm in thickness.*   

Thursday, July 19, 2012

Fear and Accepting Failure

Fear is a strange thing.  It can keep us from doing what we enjoy. 

Eight months ago I had an idea for a men's necklace.  The inspiration struck, I excitedly drew it in my sketchbook, and there it stayed.  Every time I flipped through the pages and saw the drawing, I loved it.  But I was afraid to do anything more than look at it.  I had the materials on hand.  I also had the tools.  My fear of failure was holding me back.  I was afraid that my abilities were not good enough to produce the desired results.  So I did not even try.

"The greatest mistake a man can make is to be afraid of making one."
 - Elbert Hubbard, Writer, Publisher, Artist, Philosopher

I came to a realization a few weeks ago that if I made a mistake on this necklace, I could just start over.  And I could make it better the next time.  

Why did it take so long for this consciousness to sink in? Perhaps because of my strong desire to succeed.  I am creating something personal, something by hand.  My work is an extension of me and I want the best possible results.

"Creativity is so delicate a flower that praise tends to make it bloom while discouragement often nips it at the bud.  Creativity is not something we can turn on and off like a faucet.  It is an experience and expression in our lives that must be nurtured.  This nurturing process means that creativity is at once a skill, an art, and a life-style." 
- Alex Osborn, Creativity Theorist

To succeed as an artist, I must be willing to accept failure.  It is a normal part of the process.  

To successfully create I will:
  • Be comfortable making mistakes.
  • Learn from these mistakes.
  • Ask myself how I can improve next time.
  • See how far I can take ideas; push the boundaries.
  • Never stop learning.
  • Always have fun.

Tuesday, July 10, 2012

Summer Read: The Night Circus

I just finished reading "The Night Circus" by Erin Morgenstern.  Mysteries and fantasy are two of my favorite genres, making it easy for this story to draw me in.

Celia is raised by her father, Prospero the Enchanter.  He is a magician.  Not any magician who deceives an audience with sleight of hand tricks.  He truly manipulates his physical surroundings, and his daughter has the same natural ability.  He trains her to sharpen these skills.  Prospero and his mysterious acquaintance, Alexander, commit Celia and Alexander's own student to a duel.  Alexander chooses a child named Marco from an orphanage to compete with Prospero's daughter.  Alexander uses his own, very different style of teaching.  His methods incorporate the use of symbols, glyphs, and imitative magic for his student. 

As they reach adulthood, Celia and Marco meet for the first time when both begin working at Le Cirque des Rêves, the Circus of Dreams.  Celia is the illusionist and Marco is the assistant for the proprietor of the circus.  They inevitably fall in love while also learning that Le Cirque des Rêves is the stage for the duel that was established many years ago.  They are given no guidelines or instruction on the rules to this contest, but eventually learn that to be pronounced the winner is to be the last one standing.   

The circus is the true star of the story.  It conjures images of something out of a Tim Burton movie.  The venue is open from dusk until dawn, with a multitude of black and white striped tents filling the area.  Guests wander around captivated, deciding which tent to step inside.  The entertainment is eerie and fantastic:  contortionists, acrobats, a cloud maze, fortune tellers, a living carousel, human statues, an ice garden. Everything is blanketed in black and white.  The author does an astounding job of immersing the reader in the circus.  I could distinctly see it, smell it, and taste it.  Le Cirque des Rêves is a fantastical place that I want to visit.

I was a little disappointed with the ending of the book.  The way in which everything neatly wraps up.  Something darker seems more appropriate.  And perhaps I am a little sad to be back in the real world, away from the magic and mystery of this circus.

Although the story did not play out exactly as I hoped and some of my questions remain unanswered, I definitely recommend reading it.  

After finishing "The Night Circus", I learned that a film is in development.  I am excited to see how the director and cinematographer bring Erin Morgenstern's Circus of Dreams to life.

Notes:
Two different perspectives on "The Night Circus" from The New York Times and The Washington Independent Review of Books.

CNN's interview with the author

This would make a fantastic theme for a party...possibly a Halloween party.


Thursday, June 28, 2012

Hand Drawn Templates for Precious Metal Clay

If you are new to precious metal clay, read my earlier post here for an overview.


Transferring hand drawn images to precious metal clay is a fun way to enhance creations.  The process is quite similar to making texture templates but allows more personalization of the artists' work.


The materials needed to make a hand drawn template are:
  • two ounces of polymer clay
  • wooden stylus
  • clay shaper tool, firm with tapered end
  • toaster oven *
* It is best to designate a small toaster oven exclusively for use with polymer clay projects. Do not use a traditional home oven.  Polymer clay emits low-level fumes while heating.  Though non-toxic, the fumes would be re-released when baking food.


The Process
  1. Take 1/4 of the polymer clay and condition until flexible.  A good tutorial for conditioning clay can be found here.
  2. Roll the clay out on a non-stick surface.  1/8 inch thickness is good to begin with.
  3. Carefully draw your image onto the soft clay with a wooden stylus.   Press lightly.  As you add more, retrace the existing lines keeping the image depth even throughout.  The shaper tool aids in "erasing" and smoothing edges.  My drawings average between 1 and 1.5 inches in height.  This is large enough to add details.  The final product on precious metal clay will be slightly smaller after firing the piece.
  4. If you are not happy with the results, fold the clay into a ball and start over from step 1.
  5. When finished, place the drawn template onto a plain index card and bake in the preheated toaster oven at 275 degrees Farenheit for 15 minutes. 
  6. Turn off the oven and allow the clay to remain inside while the device cools completely.

The drawn template is now ready to use.  Practice on a softened piece of polymer clay.  Spritz with distilled water before testing so that the clay will not stick.  

Lightly apply a product such as Cool Slip or olive oil to precious metal clay prior to using the template.


Thursday, June 21, 2012

Jewelry Design Inspiration

The inspiration behind the jewelry I create emerges in several ways.  A topic may spark an extensive drawing session.  This leaves me with ideas to make immediately, or alternatively, can give me more to build on.  Other concepts come about by playing with materials.  This is my favorite way to create.  Trying new and unexpected ideas with materials is fun.  I gain knowledge by doing this and improve my skills, even if the attempts are not successful.


Let me dissect the design process behind this pair of earrings I recently finished.  The inspiration came from one of my tools. 


I love the style of these dividers.  I bought the tool new, but it feels like an item that could have been used 60 years ago.  They appear sturdy and industrial.  I like the angles of the legs.  As a fan of texture, I appreciate the bumpiness of the buttons and handle.  Everything about them is very functional.


Considerable amounts of thought and sketching brought about this creation.


I created two buttons from precious metal clay and added texture to the sides.  Next, I balled the end of sterling silver wire to represent the knob from the dividers.  


The vintage copper bead corresponds to the thickness along side the divider's button.  I liked the appearance of the copper under rather than over the button in my design.


The flared triangle earring shape symbolizes the legs of the divider.  It is cut from sterling silver sheet.


I wanted to cover the piece with texture.  Hammering steel letters from a stamping set onto the silver would give the desired effect.  Did I want straight lines or an X shape? Practicing on a small piece of copper first (much more affordable than sterling silver) allowed me to see which pattern I preferred.  


Two holes were drilled into the triangle for attaching the balled wire and an earwire.  I hammered one end of each wire to flatten and appear more durable.  Rounding the hammered ends slightly with a file provides a finished look.  The wires were given loops and added to the triangle.  I squeezed them and gave a slight flare; functional because it prevents the wires from slipping off and it looks nice.  The earwire was formed by shaping around a pen.


The entire piece was given a patina.  I love the results on metal.  Tiny details and imperfections stand out to give the jewelry more character.


Where do you find inspiration? Share your ideas and methods!

Thursday, May 31, 2012

Collaborating

A great way to connect with others in the Etsy community is by joining teams.  I recently became a member of Artists Helping Hands.  The team captain, Elise, envisioned a group of compassionate artists uniting to help those in need through creativity.  Each month, an organization is chosen by the team to benefit from the members' efforts.  Handmade items are donated to the cause.  Collaborative projects are made and auctioned; the proceeds given to that month's charity.  Artists Helping Hands is a new venture and has completed its first project with Genesis Women's Shelter in Dallas, Texas. The inaugural undertaking is outlined here by Trey of 2 Horse Weaving.  

The second project for Artists Helping Hands is donating handmade beads to The Beads of Courage Program.  Our team captain also requested beads for collaborative necklaces that are being created for auction.   I am honored to be one of several team members who is assembling necklaces. All proceeds from the public sale will benefit this wonderful program.  The color theme is a happy combination of blue, pink, and purple, designed by many loving hands for this specific purpose.  I cannot wait to see how it all blends together.

Collaborative Necklace Donations

Wednesday, May 23, 2012

Little Ways to Make A Small Business More Socially Responsible

Reuse
Boxes and packaging that are in good condition can be reused.  Remove any previous labels and color over extra markings with a heavy black marker before shipping.

Save your scraps! Can they be upcycled or donated? 

Increase Efficiency
Combine tasks such as picking up supplies, meeting with clients, and shipping packages into one trip to reduce the amount of driving.  Make errands more environmentally friendly (and fun) by walking or biking if possible.

Support
Do you believe in shopping locally? Buy supplies from nearby stores.  Prefer giving your support to other small businesses owners? Research independent suppliers for your business needs.  Do any companies share a common belief or endorse causes that are important to you? Purchase from them.  (I like ordering from Rio Grande Jewelry Making Supplies  because of their approach to renewable energy and great customer service.)

Mentor
Serving as a teacher or guide to another person is rewarding for both parties.  If the business is very small, and without extra funds, working with a high school or college student as an intern could be a good choice.  You will streamline your process.  The trainee will benefit from your business knowledge and particular areas of expertise.  Positive support from an adult role model makes a huge impact on young lives.

Volunteer
Give your time outside of work to a cause that you believe in.  Not only will it make you feel good, you will gain new skills.  Skills that could be applied to your small business. 

Spread the Wealth
Donate a portion of your sales to a favorite charity.  Do what you can.  Even if it is a small percentage, you are making a difference.  If the funds are too tight, spread the word.  Tell others about the organizations that you want to support.  Serve as a humanitarian.  Be an example through your actions.


Get inspired.  Take a look at  5 socially conscious startups


Tuesday, May 1, 2012

Authenticity Part 2: The Handmade Movement

Last week's thoughts on Authenticity motivated me to do more research.  I began to ask myself questions:  When exactly did the Handmade / DIY Movement begin? What started it? Is it as big as I perceive it to be?

The Do-It-Yourself mentality has been going strong for some time.  This article from the National Building Museum illustrates how both the surge in home ownership between 1890 and 1930, and a multitude of new products with step-by-step instructions in the 1950s and 1960s,  transformed hobbyists into handymen and handywomen.   Amidst the enthusiasm of DIY Home Improvement, This Old House was first broadcast in 1979.  It's popularity continues today.

This Old House is a favorite show of mine.  Watching the team progress through the home remodel is fascinating.  The crew completes each step thoroughly.  No mediocrity here.  Everything is built to last.  Local craftsmen are commissioned to fashion ironwork for balconies, repane original windows, and replace vintage trim with historically accurate pieces.  This teamwork keeps the house authentic.

I return again to authenticity and our desire for it as consumers.  We do not want the same exact thing as everyone else.  We do not want all of our purchases to be manufactured  in China.  We do not want cheaply made.  We do not want unsafe.  We do not want pesticides in our vegetables and meat that is burdened with antibiotics.  Fortunately, these opinions are prevalent.  We are doing something about it.  We are getting smarter about purchases.  We are growing our own food and supporting CSAs.  We are making. We are recycling.  We are upcycling.  We are crafting.   

Our search for the genuine, unique, or quirky has been made much more accessible by the internet.  Online marketplaces such as Etsy allow the buyer not only to purchase handmade and vintage items, but also to communicate with the creator / seller.  Artists have the opportunity through Etsy for their work to be put in front of a global audience, to make a living without the necessity of a brick and mortar shop.  Artisans are taking their own passion for authenticity, individuality, and durability, and becoming social entrepreneurs

I may not be an expert yet like Norm Abram on This Old House, but I am learning.  I am acquiring many new skills along the way.  I am making.  If something that I create with my own hands is liked enough that a person wanted to give it as a token of friendship, love, or appreciation, that is all I need to feel rewarded.


Thursday, April 26, 2012

Authenticity Part 1

I recently watched the movie Chocolat (2000).  A few days later I watched a TED Talks on the topic of "What Consumers Want".  I felt that these two viewing experiences tied together.

In the TED Talk, author Joseph Pine explains why consumers value authenticity.  He states that we want genuine experiences, not drive thru or big-box, megastore type experiences. I agree.  For example, when I think about trips I have taken and the meals consumed during those trips, some are considerably more memorable than others.  I recall eateries that are off the beaten path; the local places with distinctive dishes and original decor.  I consider activities such as hiking through a forest or playing in the ocean waves authentic experiences.  Events that have me completely immersed in the moment and surroundings.  I want to drink in the sights, smells, tastes, and sounds.

How does Joseph Pine's theory on authenticity relate to a film set in a constrained French village during the year 1959? If you have not seen it, a brief overview:  Vianne (the lovely Juliette Binoche) breezes in to a small community with her daughter and opens a shop.  Vianne is an expert chocolatier.  Coincidentally, the season is Lent and the townspeople are counseled to avoid tempting confections.  Vianne is not disheartened.  She believes in herself. We observe her warmth and morale radiating to and influencing the villagers.  They begin to trust her.  Vianne does not judge them or expect certain behavior.  They confide in her.  They gain confidence and begin to see their true selves.  Not surprisingly, her chocolaterie becomes successful. This film relates to the TED Talks because Vianne provides an authentic experience through her shop.  She is true to her heritage - we learn that her mother was also a chocolatier.  Vianne is true to herself by doing (making) what she loves.  The happiness which comes from it radiates to those around her.  It is even reflected in the colorful clothing she wears.  She does not try and conform to the town. (Vianne's daughter asks why she does not wear black shoes like all of the other mothers.) She invites passers by to come in and experience the chocolaterie; providing them a friendly, non-judging, inviting place that has customers returning.  Why do they return? They enjoyed the memorable, genuine, authentic experience.

Thursday, March 15, 2012

Adding Texture to Precious Metal Clay

Precious metal clay, PMC, is a versatile medium to use for crafting.  In an earlier blog post, I gave a basic overview of metal clay along with some guidelines on getting started with it.  Now I am sharing a favorite attribute of this material - its ability to accept texture.

  Texture is defined as: "the characteristic visual and tactile quality of the surface of a work of art resulting from the way in which the materials are used."
Textured items are very appealing to me.  I love their depth, feel, and visual interest.  In a pmc beginner course, I was introduced to texture tiles.  These are flat rubber stamps.  The instructor helped me create a necklace by pressing these tiles into the metal clay; leaving an imprint.  I was hooked.  I wanted to make more jewelry and I wanted it to be original.

A purchased texture tile
       
 My enthusiasm led me to create my own texture tiles.  Four things are needed to do this:
  • an object with small, raised or imprinted details - items found around the house are good to start with
  • distilled water in a spray bottle
  • two ounces of polymer clay
  • toaster oven *
*Home ovens are not recommended.  Polymer clay releases low levels of non-toxic fumes while heating.  These fumes can leave a residue in the oven which would be re-released when baking food.  Check into getting a toaster oven that will be designated solely for polymer clay crafts.  I found a nice one for $15 at Goodwill.

Create a texture plate:
  1. Assemble the materials.  Pinch off 1/4 of the polymer clay.  Condition the clay until it is soft and pliable. 
  2. Roll the polymer clay out like dough, leaving it at least 1/8 of an inch in thickness.
  3. Spritz the surface of the clay with distilled water - this prevents your textured object from sticking to it.
  4. Press the texture into the clay and gently remove.
  5. Happy with the results? If not, squish the clay and repeat steps 2 through 4.
  6. Place the texture tile on a plain index card and bake in the preheated toaster oven at 275 degrees Farenheit for 15 minutes.  When the time is up, turn off the oven and leave the clay inside until the oven is completely cool.  This strengthens the clay. 
A few of my homemade tiles
                                                   

To inhibit the texture tile from sticking during use on metal clay, lightly apply a substance such as Cool Slip, olive oil, or Burt's Bees Natural Hand Salve to the surface before making an imprint.


Thursday, March 8, 2012

What is Precious Metal Clay?

An image of a stunning necklace followed by the caption "created with precious metal clay", set me on a path of exploration.  Precious metal clay? What is that? As a girl that grew up loving Play-Doh, then Model Magic as an adult,  I had to learn more.

Precious metal clay is a substance developed by Mitsubishi Materials of Japan in 1990.  PMC is microscopic silver or gold particles combined with water in an organic binder to form a material with qualities similar to modeling clay.  As with other soft clays, metal clay can be sculpted using hands or simple tools, shaped, molded, and given texture.

After a precious metal clay creation has air-dried, it is fired in a kiln or with a hand-held torch.  This burns away the binder leaving only the pure metal.  Depending on the type of metal clay used, some shrinkage will occur. 

Sounds amazing, right? A couple of things before you run out and buy it:


 * It is not cheap.  A 16 gram package (this is just over half an ounce) of silver PMC is around $37 and can fluctuate with the silver market.  As expected, gold metal clay is significantly higher.  Copper and Bronze metal clays are lower cost alternatives.


* It dries out very quickly.  You'll want to know what to expect and plan your design before opening the package.

I highly recommend enrolling in a beginner course before purchasing any materials.  I found a local certified instructor with whom I spent a Saturday; happily learning the basics.  A one-time class cost me around $75.  This included instruction time and all materials.  I left the workshop with my own necklace and a head full of ideas...that I am still building on.

Visit this gallery for a slideshow of designs by PMC artisans.  Fascinated? Search for a local class.

If you are already familiar with pmc, Cool Tools is a great resource.  The site includes an online learning center with videos, guides, and projects for beginners and beyond.  Cool Tools also offers the most competitive pricing I have found when  purchasing precious metal clay. 


Thursday, January 19, 2012

Baking Peanut Butter Chocolate Chip Banana Bread

I love breakfast food.  This particular bread is so delicious, that I actually look forward to getting out of my warm bed on cold mornings to eat it.  


The Recipe

2 cups flour
1 cup sugar
1 Tbsp baking powder
1/2 tsp salt
2 bananas
1/3 cup milk
1/3 cup peanut butter
3 Tbsp vegetable oil
1 egg
3/4 cup semi-sweet chocolate chips

Preheat oven to 350 degrees.  Cover the bottom of a loaf pan with non-stick cooking spray.  Combine flour, sugar, baking powder and salt in a large bowl.  Mash the bananas in a medium-sized bowl.  Add milk, peanut butter, oil and egg to the banana mixture.  Stir well, then join with the dry ingredients, mixing just until moistened.  Blend in the chocolate chips.  Spoon the batter into the loaf pan.  Bake for 60 minutes or until toothpick inserted in center comes out clean.

Total servings:  9 thick slices

Tuesday, January 10, 2012

Daily Dose of Wonder

I have a creativity coach which I regularly consult with.  She is positive and upbeat each day.  Her words inspire me to be my best, artistic self.

Jill Badonsky is my creativity consultant.  The words and advice I receive are through her book, The Awe-Manac: A Daily Dose of Wonder.  This playful guide is reminiscent of the Old Farmer's Almanac, but with a more-fun-than-practical approach.  Rather than predicting the weather, Ms. Badonsky proposes a "toast of the day"; celebrating little delights that we may normally take for granted.  She does not offer much instruction on farming.  However she does feed the soul with her "daily soul vitamins" - quotes that she anticipates will ignite your heart energy.  The Old Farmer's Almanac may suggest daily commonsensical activities such as washing windows.  The Awe-Manac might propose an amusing exercise like drawing on your windows.  Famous birthdays and holidays (a few of which are made up) are also observed.  (Did you know that January 22 is Cat Appreciation Day or that February 8th is Think Like A Kid Day??) Jill Badonsky's creative prompts are entertaining and designed to stimulate the artistic mind.  Pick up your own copy of the book and prepare to laugh, smile, and be reminded not to take life too seriously.

Tuesday, January 3, 2012

Bring on the New

What does 2012 hold for Indyspire Art? I am ready to be back in the workshop.  Fabricating jewelry regularly sparks new ideas, which has left me with a sketchbook full of concepts for original pieces.  In the coming months, imaginative designs for both women and men will be added to my Etsy shop.   I will continue working with quality materials; my current favorites being copper, precious metal clay, and sterling silver.  These beautiful metals will be incorporated into rings, necklaces, earrings and bracelets.

As the monthly planner fills with creative time and blogging, and more content for tracking the latest fashion and trends is added to my Google Reader, I am increasingly excited for this new year.  Here's to a fabulous 2012!