Showing posts with label DIY. Show all posts

Tuesday, October 30, 2012

Holiday Prep for Handmade Business, Part 3: Packaging

When a customer receives a package from your handmade business, they should be excited! They are opening something special.  The packaging should reflect how unique the contents are.  What can you do to stand apart without investing significant amounts of time and money on intricate wrapping?

product packaging
Via Cutiepie Company on Flickr


Packaging handcrafted goods can be both fun and challenging.  Finding the right details to set the tone takes time.  Think of the word handmade.  What do you envision? To me, it resonates with original, imperfect, detailed, and creative.  I do not think of it as busy, overbearing, or trying too hard.

I relish the little details.  Simple, clever additions that don't try to go overboard. The use of decorative edge scissors.  Textures on bows or fabric. Stamps and stickers can be good ways to include your theme without being overly expensive. Reusing items in a surprising way.  A pleasing color scheme. What materials will invoke your product and your self  into the overall look of the parcel?

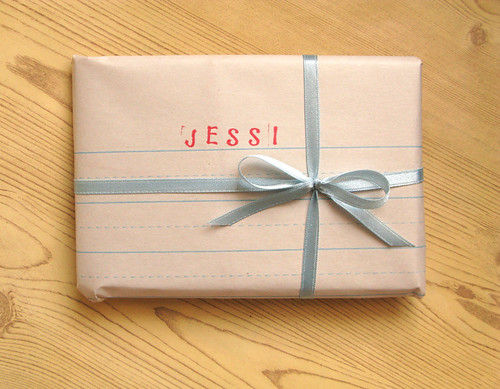
The gift shown here from Cutiepie Company is the perfect example.  It is wrapped in elementary school writing paper.  Very simple, yet a surprising choice. They have added a ribbon - small, not complex, and complimentary to the lines on the paper. Stamping the recipient's name is great. The font is legible and not overly sophisticated.  Red stands out on the paper and brings to mind a teacher's grade at the top of the page.  I would guess the package might hold a journal, stationery, or special writing set.

Consider the recipient of your item.  Do you sell to men and women? Simplify things by going with gender neutral packaging.  The gift in the photo could be for anyone of any age on any occasion.  It is charming enough to be a holiday gift.  Try to find wrapping that works year round.  This makes things easier on you as a seller.

As you prepare to ship those holiday orders for your handmade business, reflect on the presentation of your goods.  What message are you giving about the contents?

Visit my earlier posts on holiday preparations for shipping  and materials.


Tuesday, September 18, 2012

Finishing the edges of leather

When incorporating leather into a piece of jewelry, I like to give the cut sides a finished appearance.  This is fairly easy to do.

Freshly Cut
You will need:
  • Q-tips
  • Distilled water
  • Beeswax
  • Lamp
  • Soft, sturdy fabric (denim from old jeans is ideal)
  • Dremel tool with cotton buffing attachment (or an additional piece of denim)
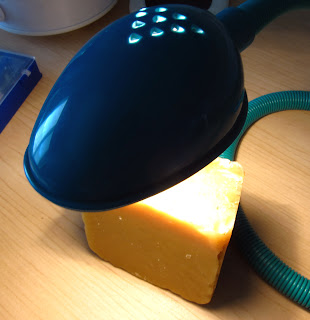
Set the beeswax under a lamp before starting.  It will become soft and easy to work with.

Block of Beeswax with Adjustable Arm Lamp

Cut a two inch by two inch square from the fabric, fold it over, and set aside.  Dip a Q-tip in distilled water and run it over the raw edge of leather.


With light pressure, rub your fabric across this moistened edge.  Keep your movement going in one direction; not back and forth.  This motion will help the fibers to lay flat. The leather must stay damp throughout this process.  Add water as necessary with the Q-tip and continue buffing with the fabric until smooth.


Apply the softened beeswax to a small, cotton buffing attachment on your Dremel or to the extra piece of fabric. Buff the edge of your leather with wax, moving in the same direction as before.  The leather will gain a burnished feel and appearance.


Remove any extra wax from your piece with a soft cloth.

A Smooth Finish

*Please note the leather I work with is no greater than 5 mm in thickness.*   

Thursday, June 28, 2012

Hand Drawn Templates for Precious Metal Clay

If you are new to precious metal clay, read my earlier post here for an overview.


Transferring hand drawn images to precious metal clay is a fun way to enhance creations.  The process is quite similar to making texture templates but allows more personalization of the artists' work.


The materials needed to make a hand drawn template are:
  • two ounces of polymer clay
  • wooden stylus
  • clay shaper tool, firm with tapered end
  • toaster oven *
* It is best to designate a small toaster oven exclusively for use with polymer clay projects. Do not use a traditional home oven.  Polymer clay emits low-level fumes while heating.  Though non-toxic, the fumes would be re-released when baking food.


The Process
  1. Take 1/4 of the polymer clay and condition until flexible.  A good tutorial for conditioning clay can be found here.
  2. Roll the clay out on a non-stick surface.  1/8 inch thickness is good to begin with.
  3. Carefully draw your image onto the soft clay with a wooden stylus.   Press lightly.  As you add more, retrace the existing lines keeping the image depth even throughout.  The shaper tool aids in "erasing" and smoothing edges.  My drawings average between 1 and 1.5 inches in height.  This is large enough to add details.  The final product on precious metal clay will be slightly smaller after firing the piece.
  4. If you are not happy with the results, fold the clay into a ball and start over from step 1.
  5. When finished, place the drawn template onto a plain index card and bake in the preheated toaster oven at 275 degrees Farenheit for 15 minutes. 
  6. Turn off the oven and allow the clay to remain inside while the device cools completely.

The drawn template is now ready to use.  Practice on a softened piece of polymer clay.  Spritz with distilled water before testing so that the clay will not stick.  

Lightly apply a product such as Cool Slip or olive oil to precious metal clay prior to using the template.


Tuesday, May 1, 2012

Authenticity Part 2: The Handmade Movement

Last week's thoughts on Authenticity motivated me to do more research.  I began to ask myself questions:  When exactly did the Handmade / DIY Movement begin? What started it? Is it as big as I perceive it to be?

The Do-It-Yourself mentality has been going strong for some time.  This article from the National Building Museum illustrates how both the surge in home ownership between 1890 and 1930, and a multitude of new products with step-by-step instructions in the 1950s and 1960s,  transformed hobbyists into handymen and handywomen.   Amidst the enthusiasm of DIY Home Improvement, This Old House was first broadcast in 1979.  It's popularity continues today.

This Old House is a favorite show of mine.  Watching the team progress through the home remodel is fascinating.  The crew completes each step thoroughly.  No mediocrity here.  Everything is built to last.  Local craftsmen are commissioned to fashion ironwork for balconies, repane original windows, and replace vintage trim with historically accurate pieces.  This teamwork keeps the house authentic.

I return again to authenticity and our desire for it as consumers.  We do not want the same exact thing as everyone else.  We do not want all of our purchases to be manufactured  in China.  We do not want cheaply made.  We do not want unsafe.  We do not want pesticides in our vegetables and meat that is burdened with antibiotics.  Fortunately, these opinions are prevalent.  We are doing something about it.  We are getting smarter about purchases.  We are growing our own food and supporting CSAs.  We are making. We are recycling.  We are upcycling.  We are crafting.   

Our search for the genuine, unique, or quirky has been made much more accessible by the internet.  Online marketplaces such as Etsy allow the buyer not only to purchase handmade and vintage items, but also to communicate with the creator / seller.  Artists have the opportunity through Etsy for their work to be put in front of a global audience, to make a living without the necessity of a brick and mortar shop.  Artisans are taking their own passion for authenticity, individuality, and durability, and becoming social entrepreneurs

I may not be an expert yet like Norm Abram on This Old House, but I am learning.  I am acquiring many new skills along the way.  I am making.  If something that I create with my own hands is liked enough that a person wanted to give it as a token of friendship, love, or appreciation, that is all I need to feel rewarded.


Wednesday, December 14, 2011

Quick & Festive DIY Table Topper

The tree is trimmed, stockings are hung, but you still need something festive to spruce up your serving table before the Christmas party.  If you are like me, you probably have some unused ornaments.  Take a look through your boxes of holiday decor and pick out some in various colors and sizes.


Find an empty container for displaying your decorations.  I used a 12-inch tall, clear glass vase with an opening large enough to fit my hand inside.  Three small ornaments (I used stars) went into the container first to act as a space filler.  I tied a string from each star on to the hanging loop of a ball ornament.  Then I stacked the ball ornaments to the top of my vase, pointing them in random directions, allowing the stars to hang at different heights.


Wrap a string of lights around your vase a few times and trail it across the table.  Lights make everything a little more jolly.  Set out your cookies and let the fun begin! ( * The string of lights is recommended for tables that are located next to a wall.  Do not run cords across the floor and risk your guests tripping over them after a glass or two of eggnog. * )